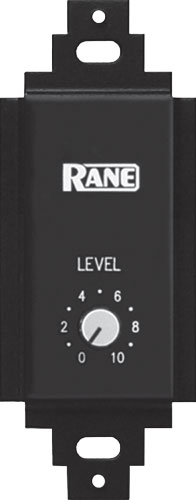
The VR 1 provides a simple "pot-on-a-wall" solution to adjust volume from a remote location for products having 0-5 VDC level inputs. The VR 1 fits in a standard US electrical box and can be paired with a Decora™ plate.
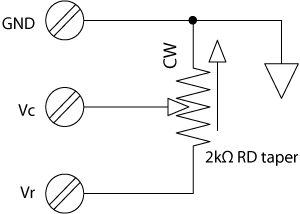
A port for a wired Remote Level control is provided for each of the six Outputs. Using the optional VR 1 Remote control provides an audio taper response from 0 dB to > -80 dB. To control more than one Remote Port with a single Remote control, it is only necessary to connect the Vc pin of each additional port.
A VR 1 may be used instead of a ZR 1 if zone selection is not required on the remote control. Simply wire the Vc, Vr and ground wires of the ZONE REMOTE LEVEL port. The range of control is 0 dB to -40 dB.
The MP 44's REMOTE LEVEL port provides a means to control the level of the MASTER mix from a remote location. The range of control is 0 dB to -40 dB. Applications include 'gain riding' DJs, setting a comfortable listening level from a remote location and reducing the maximum available gain.
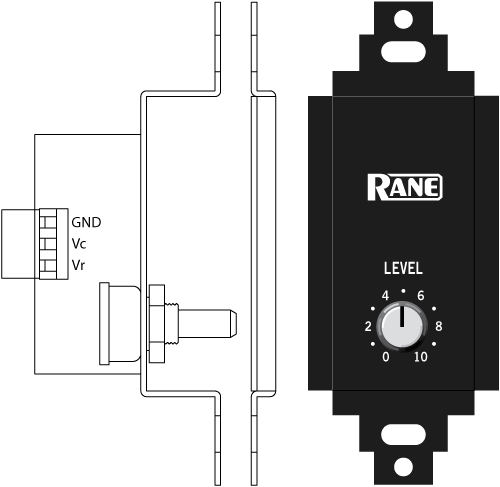
The VR 1 remote assembly mounts in a standard U.S. electrical box with a minimum depth of 2.25" (5.5 cm). Use the flat head #6 screws supplied with the kit to mount the remote assembly and silk-screened front panel to the electrical box.
Turn the power to the unit off until all connections are made. It is important to ensure that the Remote Ports are not subjected to sustained voltages outside the range of 0 to 5 VDC or high levels of static. Inputs are protected, however, caution is the better part of ... you know. It is a good idea to install the wiring, connect it to the Remote and then make the final connections at the Remote Port.
Do not short the Vr pin to ground. This pin is current limited; however, excess heat is generated in the 5 V supply if a short occurs. Never subject the Vr pin to voltages above 5 V.
Install the knob so the line on the knob is properly aligned with the silk-screening on the front panel of the remote. Install any Decora plate of your choice. For a secured installation, you may wish to leave the knobs off and use a blank Decora plate to cover the remote after adjustment.
You may use 5-conductor unshielded remote control signal cable for shorter runs (less than 200 ft.) or 4-conductor (2 pair) shielded remote control signal cable (use the shield as the GND return) for longer runs (200 to 1000 ft.). The type of wire required is influenced by your installation and local electrical codes. Variations in wire type do not greatly affect the performance of the remote controls. Rane does not provide or source cable. Please contact your local retail or wholesale outlet, not the Rane factory.
The following is a short list of suitable cable types:
CONSOLIDATED ELECTRONIC WIRE AND CABLE
Plenum cable:
Unshielded remote control signal cable CAT. #9896
Shielded remote control signal cable CAT. #9877 or #9852
WEICO WIRE & CABLE INC.
Communication and control cable:
Multiconductor, unshielded CAT. #7606
ALPHA
Communication and control cable:
Multiconductor, unshielded CAT. #1175C
BELDEN
Unshielded remote control signal cable CAT. #88741
Shielded remote control signal cable CAT. #88723
Note: the VR 1 has the same appearance as the VR 2, it just uses a different value pot.
Is it possible to use a single VR 1 to control volume remotely and still use the front panel program selector on CP52 / CP64 series units?
No, once the RMT switch is engaged on a CP 52 / CP 64 series, it disables the Program Selector switch. Using a VR 1 with CP 52 / CP 64 series models yields only Line 1 input being available for that zone. Automatic switching to Priority / Line 4 program input is unaffected by this combination.
"How do I mount Rane Decora remotes in a rack?"
We recommend Lowell rack panels.
If the above doesn't answer your question, or it's urgent...
Phone 425-355-6000, 8:30 AM to 5 PM PST, Monday through Friday.
If it's less urgent, you can email the factory.