Selecting a power amplifier for a specific loudspeaker is easy; selecting a preamp for a specific microphone is not. Terminology is the problem. At one end we find power amplifier and loudspeaker manufacturers speaking the same language, or at least using the same vocabulary. Power amps are rated in watts and ohms, while loudspeakers are rated in ohms with a maximum power handling capability stated in watts.
Unfortunately, at the other end, microphone and preamp manufacturers do not speak the same language or use the same vocabulary. One is rated using sound pressure level (SPL) while the other rates itself in volts (dBu).
This note explains how to convert microphone specifications into preamp specifications, making selection and comparison easier. No math is involved since handy look-up tables do the math for you. Key terminology is explained and cross-referenced.
Acknowledgement. Acknowledgement usually comes at the end, however this technical note would not exist had it not been for an article authored by Tomlinson Holman, published in the September 2000 Surround Sound Professional magazine, titled "Capturing the Sound, Part 1: Dynamic Range." In that article Tom deftly demonstrated the difficulty in properly matching microphones and preamplifiers. His article motivated me to do this expanded and generalized note.
Buyer's guides for 2001 list microphones ranging in price from $50 to $8,000, and microphone preamplifiers from $150 to $4,500. Whether you spend $200 or $12,500 for one microphone and a preamp to go with it, it pays to make sure they are compatible. Luckily, knowing how to do this skillfully depends not on your budget -- but rather on this free tech-note.
Selecting the right preamp for a given mic, or conversely selecting the right mic for a given preamp, involves two major things (and a bunch of minor ones):
You need to determine whether the microphone under worst-case conditions is going to overload the preamp input stage and whether the preamp is going to materially degrade the noise performance of the microphone.
Actually, microphones have few specifications. Most are sold on sound, reputation and price. Specifications rarely enter into it. Even so, enough exist to make the right decision.
Other issues include the proper input impedance. Recently the trend is toward higher input impedances than classic designs, with many now rated 2 kilohms and higher. Since the connected impedance (i.e., mic plugged into the preamp) determines the noise performance, and the microphones are low impedance (150 - 200 ohms) then there is no noise penalty for providing higher input impedances.
Another thing to examine is phantom power. Is it provided? Do you need it? Is it the correct voltage, and does it source enough current for your microphone? This is an area where you need to make informed decisions. There is a huge myth circulating that microphones sound better running from 48 volts, as opposed to, say, 12 volts, or that you can increase the dynamic range of a microphone by using higher phantom power. For the overwhelming majority of microphones both of these beliefs are false. Most condenser microphones require phantom power in the range of 12-48 VDC, with many extending the range to 9-52 VDC, leaving only a very few that actually require just 48 VDC. The reason is that internally most designs use some form of current source to drive a low voltage zener (usually 5 volts; sometimes higher) which determines the polarization voltage and powers the electronics. The significance is that neither runs off the raw phantom power, they both are powered from a fixed and regulated low voltage source inside the mic. Increasing the phantom power voltage is never seen by the microphone element or electronics, it only increases the voltage across the current source. But there are exceptions, so check the manufacturer, and don't make assumptions based on hearsay.
Final selection details involve checking that the preamp's gain range is enough for your use, that there are overload indicators or metering to help in set up, that the plumbing is compatible with your wiring needs, and that the color doesn't clash with your tour jacket.
Determining input headroom compatibility requires knowing the microphone sensitivity rating and the maximum SPL allowed. The sensitivity rating is usually the easiest and least ambiguous number to find on the data sheet, rated at 1 kHz and expressed in millivolts per pascal (mV/Pa). One pascal is the amount of pressure resulting from a loudness level of 94 dB (written as 94 dB SPL). For example, a sensitivity rating of 20 mV/Pa tells you that when a sound equal to 94 dB SPL strikes the microphone element, it results in an output voltage of 20 millivolts.
The sensitivity rating gives you a voltage level at one reference point; now all you need is the mic's maximum SPL and you can calculate the maximum output voltage. Then you use this to compare against the maximum input voltage rating of the microphone preamp.
The maximum allowed sound pressure level is stated in several ways: Maximum SPL (often with a stated THD level), Max Acoustic Input, Sound Pressure Level for X% THD, all are variations for the same rating.
With these two specifications it is a simple matter to calculate the maximum output level in volts and convert that into the familiar dBu units found on microphone preamp data sheets. To make this even easier Table 1 is provided. To obtain the microphone maximum output level in dBu, find your microphone's sensitivity rating on the left side and then move right until you are directly below your microphone's maximum SPL rating. As an example, for a microphone with a sensitivity rating of 20 mV/Pa and a max SPL equal to 130 dB, Table 1 tells us that the maximum output voltage is +4 dBu. You now have what you need to compare preamps regarding maximum input level.
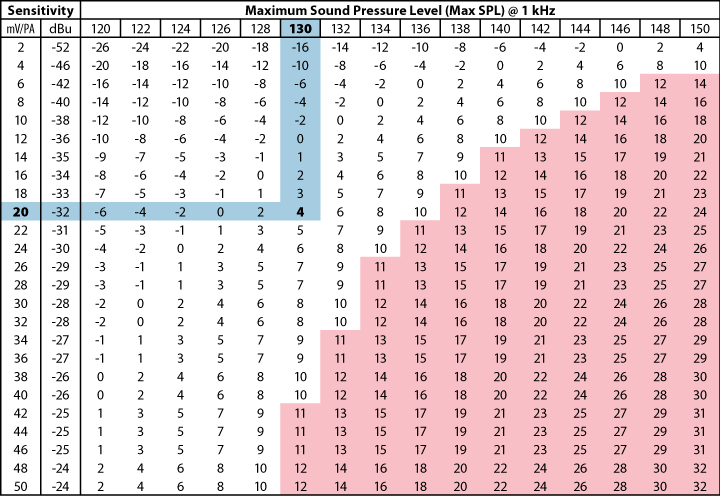
Another example using Table 1 is to block out all possibilities that could overload a specific preamp. For example, the red triangle area represents all those combinations that could overload Rane's now discontinued MS1S Mic Stage. The MS1S's maximum input level is rated at +10 dBu, therefore all microphone sensitivity and max SPL combinations resulting in greater than +10 dBu are excluded from consideration. Used this way, any new microphones can be quickly checked for overload threat.
Caveats. Remember though, that this output level only occurs under the worst-case condition of sound pressure levels equaling the maximum allowed by the microphone. This means that if your application has sources that cannot achieve the maximum sound pressure levels, then you can relax your input overload requirement accordingly. For instance, if you know your source is never going to exceed, let's say, 110 dB SPL, and your microphone is rated for maximum levels of 130 dB, then you can take 20 dB off the levels shown in Table 1, and widen your preamp choices considerably.
Note also that input overloading is a strong function of the preamp's gain control setting. Most preamp manufacturers measure the maximum input level with the gain control set at minimum. This means there is a real danger that after carefully matching the output and input levels of a microphone and preamp, you find that the mic still overloads the preamp. This happens when the system needs the preamp gain turned up (correspondingly reducing input headroom) and the microphone is used for a wide dynamic range source. Unless there is a person riding gain, or some provision for automatic input ranging, overload is STILL going to occur. This means that not only do you have to worry about matching your mic and preamp, but also about real-world sources and gain settings.
|
Table 2. Output Noise for Dynamic Mics
|
Microphones and preamps each have their own noise floors. When selecting a mic preamp you want to know to what degree the preamp's noise degrades the noise of your microphone. Different microphone technologies use different terminology to describe noise.
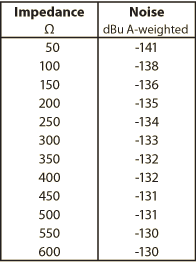
Dynamic Microphones. Dynamic microphone data sheets rarely list noise as a specification since there is no active circuitry to generate noise; there is only a magnet and a coil. This category of microphone is properly called electromagnetic or electrodynamic. The output noise is very low -- so low they just don't list it. However, they do generate some noise and it is calculated by knowing the microphone's impedance.
Obtain the dynamic microphone impedance rating from the data sheet and use Table 2 to convert that into units of dBu, A-weighted. This noise is the white noise generated by the resistance of the wire used to create the coil, plus a correction factor of 5 dB for A-weighting. (This is somewhat arbitrary, as true A-weighting may decrease the level anywhere from 3-6 dB depending upon the nature of the noise, but agrees with Holman's article and measured results).
The noise of the measuring standard 150 ohms (200 ohms for Europe) source resistor makes a good noise reference point. From Table 2, find that it equates to -136 dBu (A-weighted; -131 dBu when not). This means that you cannot have an operating mic stage, with a 150 ohm source, quieter than -136 dBu (A-weighted, 20°C/68°F, 20 kHz BW). Looking at Table 2 confirms that dynamic microphones, indeed, are quiet.
Condenser Microphones. Condenser, capacitor, or more properly, electrostatic microphone technology involves a polarizing voltage network and at least a buffer transistor built into the microphone housing, if not an entire preamp/biasing/transformer network -- all of which contribute noise to the output. Electrostatic microphones are quite noisy compared to dynamic designs, but are very popular for other reasons.
Different manufacturers use different terminology on their electrostatic microphone specification sheets for noise: Self-Noise, Equivalent Noise SPL, Equivalent Noise Level, Noise Floor, and just plain Noise all describe the same specification. Microphone noise is referenced to the equivalent sound pressure level that would cause the same amount of output noise voltage and is normally A-weighted. This means the noise is given in units of dB SPL. A noise spec might read 14 dB SPL equivalent, A-weighted, or shortened to just 14 dB-A (bad terminology, but common). This is interpreted to mean that the inherent noise floor is equivalent to a sound source with a sound pressure level of 14 dB. Problems arise trying to compare the mic's noise rating of 14 dB SPL with a preamp's equivalent input noise (EIN) rating of, say, -128 dBu. Talk about apples and oranges.
Luckily (again) tables come to the rescue. Table 3 provides an easy look-up conversion between a microphone's output noise, expressed in equivalent dB-SPL, and its sensitivity rating, in mV/Pa, into output noise expressed in dBu, A-weighted. Using Table 3, a direct noise comparison between any microphone and any preamp is possible. The example shown by the blue column and row is for a microphone with a noise floor of 14 dB-SPL and a sensitivity rating of 20 mV/Pa, which translates into an output noise of -112 dBu, A-weighted.
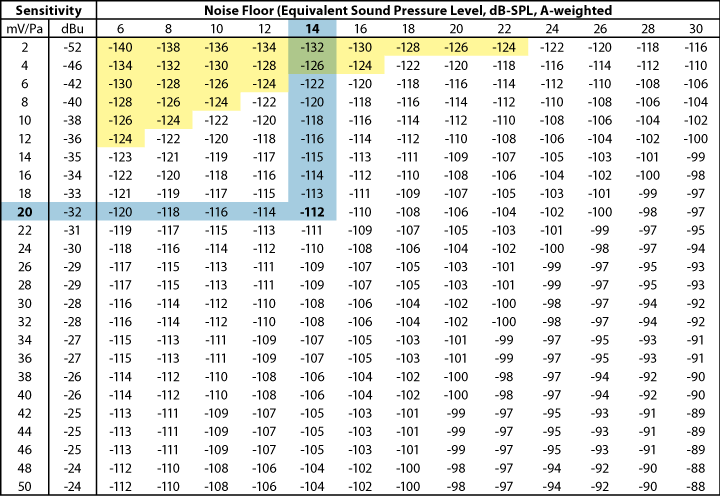
Similar to Table 1, you can use Table 3 to map out a preamp's A-weighted noise to show the combinations that add insignificant noise. If you use a -10 dB difference figure as a guide, then the preamp's noise amounts to less than 0.4 dB increase. The red-shaded triangle area in Table 3 shows an example of this. The areas not shaded represent all possible combinations of microphone sensitivity and noise specifications that could be used with Rane's discontinued MS1S Mic Stage, for instance, without adding significant noise.
The following procedure summarizes this note for evaluating the compatibility of any microphone and any preamplifier:
![]() "Selecting Mic Preamps" Download this note in PDF.
"Selecting Mic Preamps" Download this note in PDF.